Privacy Boost in iOS 18
It’s not uncommon that you would pass your iPhone to someone to let your nephew play some games or simply show your friend your vacation photos. But even with people whom you can trust, there are probably parts of your phone that you wouldn’t want them to see on purpose or not.
Now, with the Face ID lock in iOS 18, it’s just the thing. You can set an application so that every time it opens, it will require the device to bring up the request for biometric authentication-such as through Face ID or Touch ID on older models let it into private messages, dating apps, or any other sensitive content.
Although some apps could be locked with Face ID before, that depended on developers adding the feature in, and those were generally limited to banking or financial apps. With iOS 18, however, that has changed: you can lock any app of your choice, which equates to better privacy control across the board.
App Locking in iOS 18
iOS 18 provided the facility to let users allow any application to be locked with Face ID without awaiting the implementation by the developers. From games and chat apps to social media, all applications can now be secured with Face ID login for greater privacy protection.
iOS 18 also brings the ability to hide apps. This is for any third-party application-so it doesn’t pertain to apps that come with the phone. Hiding an app removes them from your home screens, placing the app in a folder called Hidden in your App Library. It also turns off notifications for that app, so remember that when you invoke it.
You can even lock or unlock apps with ease from the home screen or via the App Library to give full control over app visibility and security.
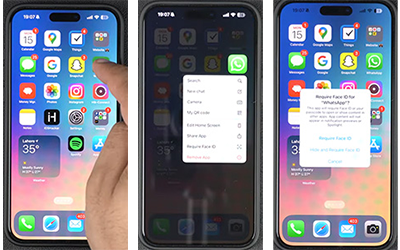
Here’s how to lock an app with Face ID, step by step:
- Long-press the app icon – This will open the app’s menu.
- Select “Require Face ID” – Tap this option to lock the app using Face ID.
- Confirm the action – A pop-up will appear. Tap “Require Face ID” again to confirm.
- (Optional) Hide the app – On the second menu, you can also choose “Hide and Require Face ID” to lock the app and hide it from your home screens.
- Review the notification – If you hide the app, you’ll receive a reminder that it will only be accessible from the App Library and you will no longer receive notifications, calls, or alerts from it.

This means when an App is locked in such a way, each time you open it, it will require Face ID approval so nobody else but you can access it.
Just long-press the app to bring up the menu again, and you’ll see the option to remove the Face ID lock. If you have already hidden the app, you can access its options from within the App Library’s Hidden folder. If you remove the Face ID lock from an app, remember that the app icon will not automatically revert to its original position on your home screen-you must manually add it.
This may be a source of anxiety, especially when one is not OK with exposing private secrets. Employ a few simple strategies that reassure you and ensure a carefree experience. First, set up a guest account or put restrictions on a certain app or information using privacy settings. Organize your files so that the important documents are not as accessible, and clear your browsing history from time to time. Besides that, you can avail other features of restrictions, putting a limit on screen time. If these precautions are considered, then you can share your phone with any other person confidently, keeping it in mind that no personal secret comes into the human visibility circle.